Adapting our Flutter mobile app to web and desktop

Although we’re using Flutter to build the Invoice Ninja web app it wasn’t our original plan. We were about six months into our big rewrite using Vue.js when we had a chance to try Flutter Web (at the time called Hummingbird) for the first time and were instantly convinced. Sure… performance isn’t quite up to native, but being able to share nearly all of our code across mobile, web and desktop is too big an advantage to pass up.

Update: In the end we decided to use Flutter for desktop and mobile and React for web. Sharing code is great but not if it comes at the expense of the final product, Flutter Web is truly amazing but not the right fit for our use case.

That being said in general you can’t just `flutter run -d chrome` and expect your mobile app to be a great web app. We found there were two areas we needed to focus on: UI layout and keyboard support.

UI Layout

I consider our app to be a relatively standard business app. It’s built with flutter_redux and uses a REST API to support CRUD actions (create, replace, update and delete). The primary views in the mobile app can be broken down to three parts: the sidebar navigation, the list view and the detail view.

A common approach to handle the mobile/desktop differences is to use a LayoutBuilder. While we do use it in some places in the app to adjust the layout slightly we don’t use it to adapt the entire UI. The navigation models between mobile and desktop are too different to make this an optimal experience on both platforms.

In the mobile app each screen is its own route. If you view the client list and then select a client there would be two routes on the stack. For the desktop version we instead use a ‘route’ string which the UI binds to. If the route is /invoice/view the UI will show the invoice list with the view panel on the side.

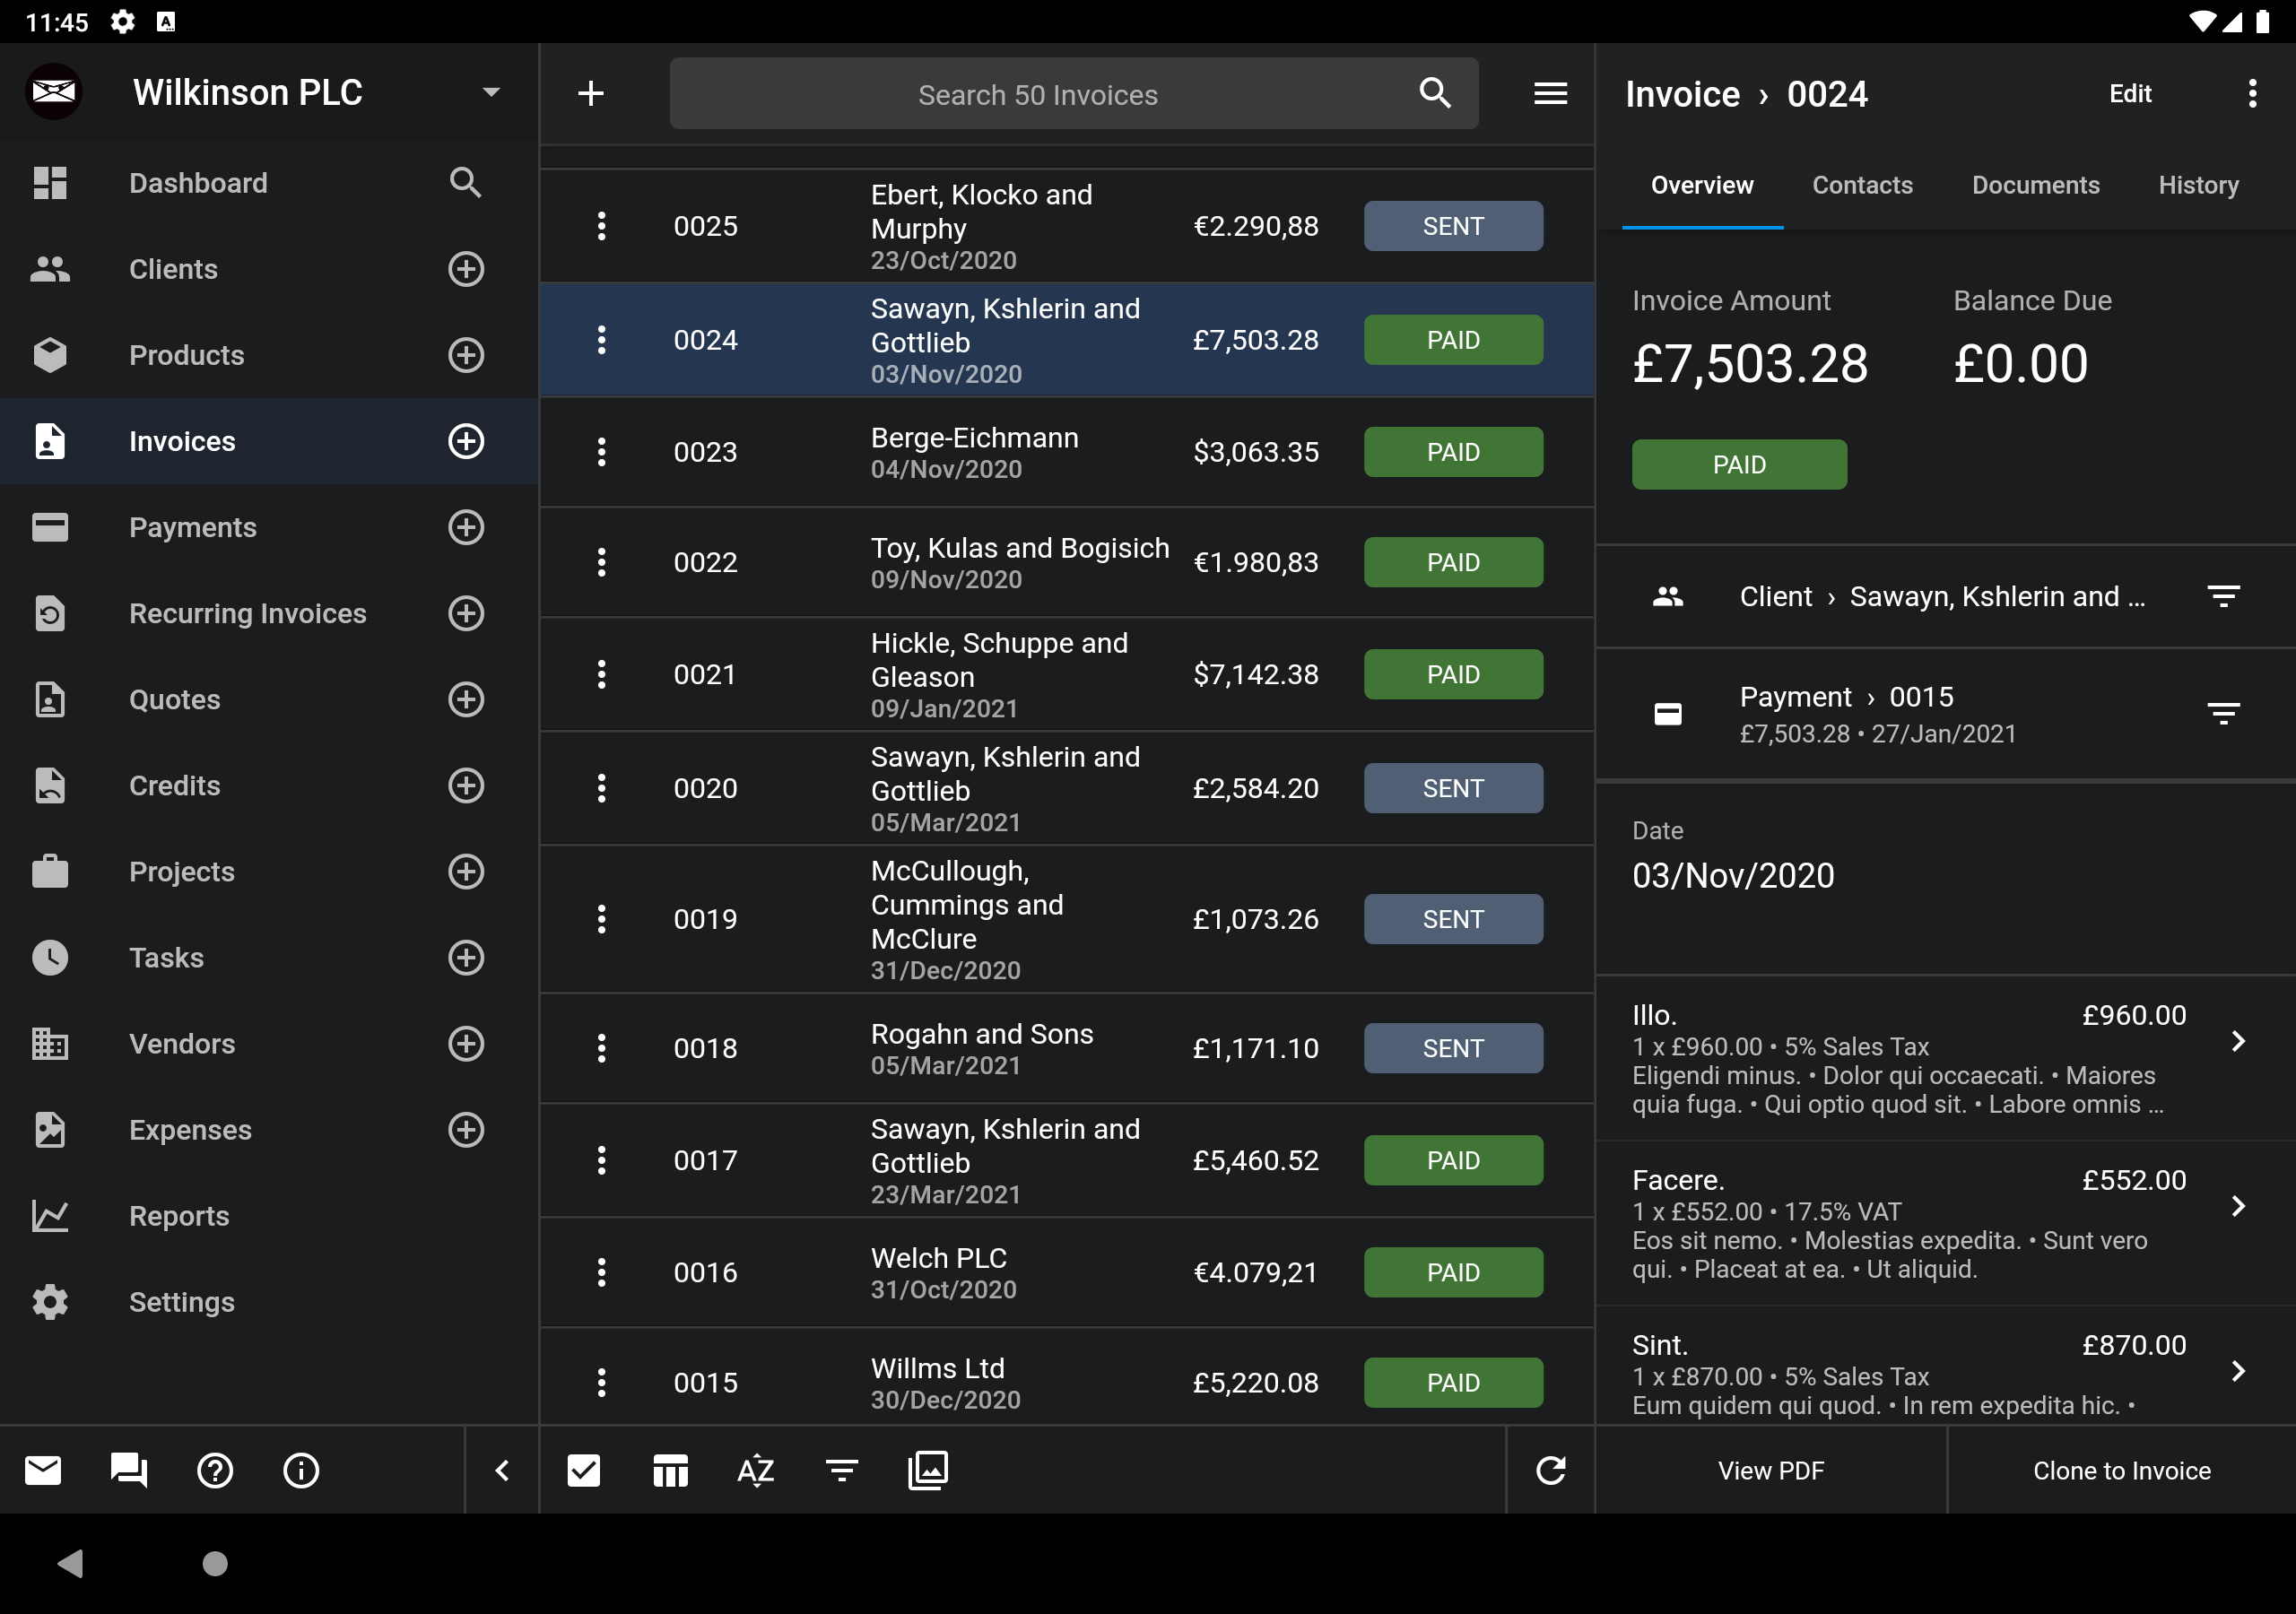
This dual navigation approach is relatively simple to implement in Flutter. In the main MaterialApp widget on mobile we set the list of routes whereas on desktop we provide an onGenerateRoute function instead.

Another example of how we adapted the mobile UI is the dashboard. On mobile it’s a single screen with multiple tabs whereas on desktop we use the two primary tabs as the center content and then show the remaining tabs on the side. The scrolling is linked to the selected tab so changing one automatically changes the other.

In the mobile app the client screen uses ListTiles to display the client’s invoices, quotes, etc. If you tap the invoices option you see the invoice list filtered by the current client.

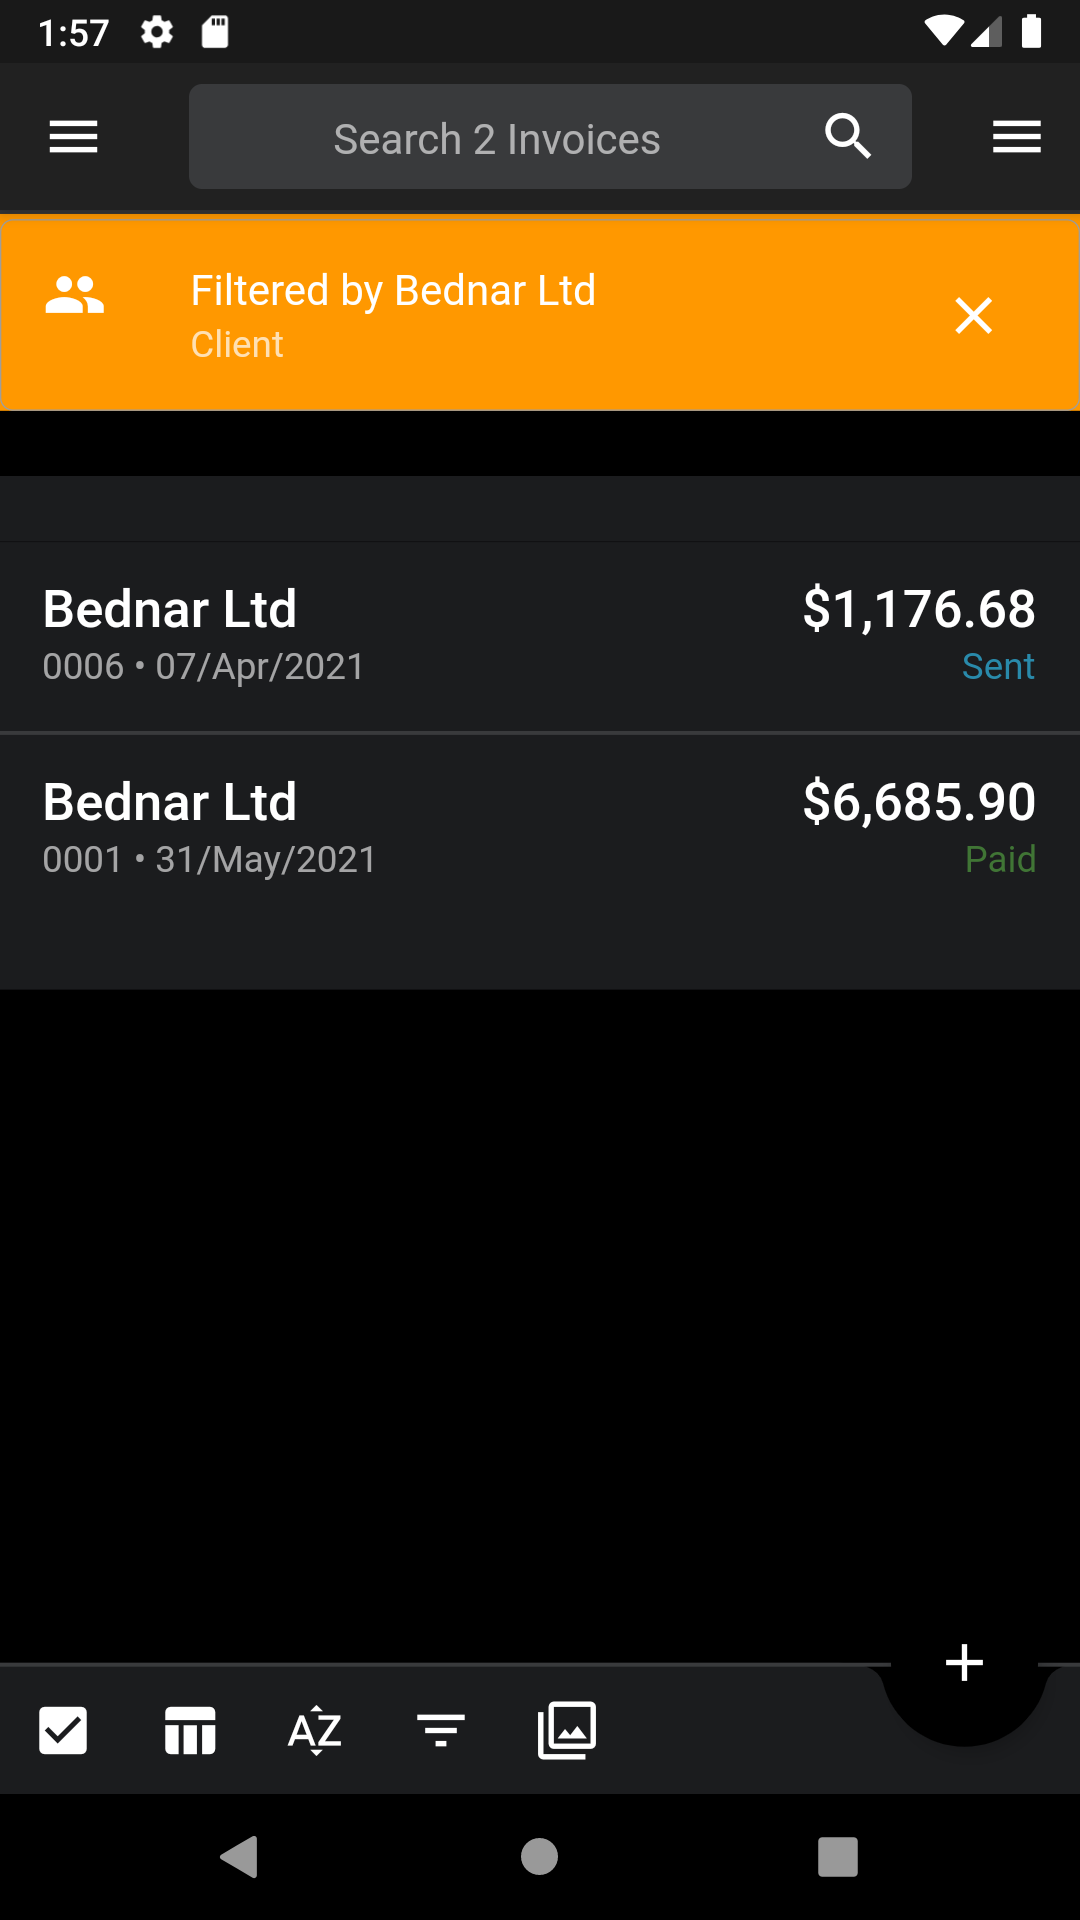
The desktop app behaves the same way, when you tap on the invoices option the invoice list is filtered by the selected client. We show a filter menu at the top implemented using the awesome overflow_view package from Romain Rastel which enables easily changing between all of the client’s records.

There’s also an option to show the filter as a sidebar on the left side of the screen. This provides a broad view of the data, enabling you to easily navigate between records while having your context remained fixed.

Keyboard Support

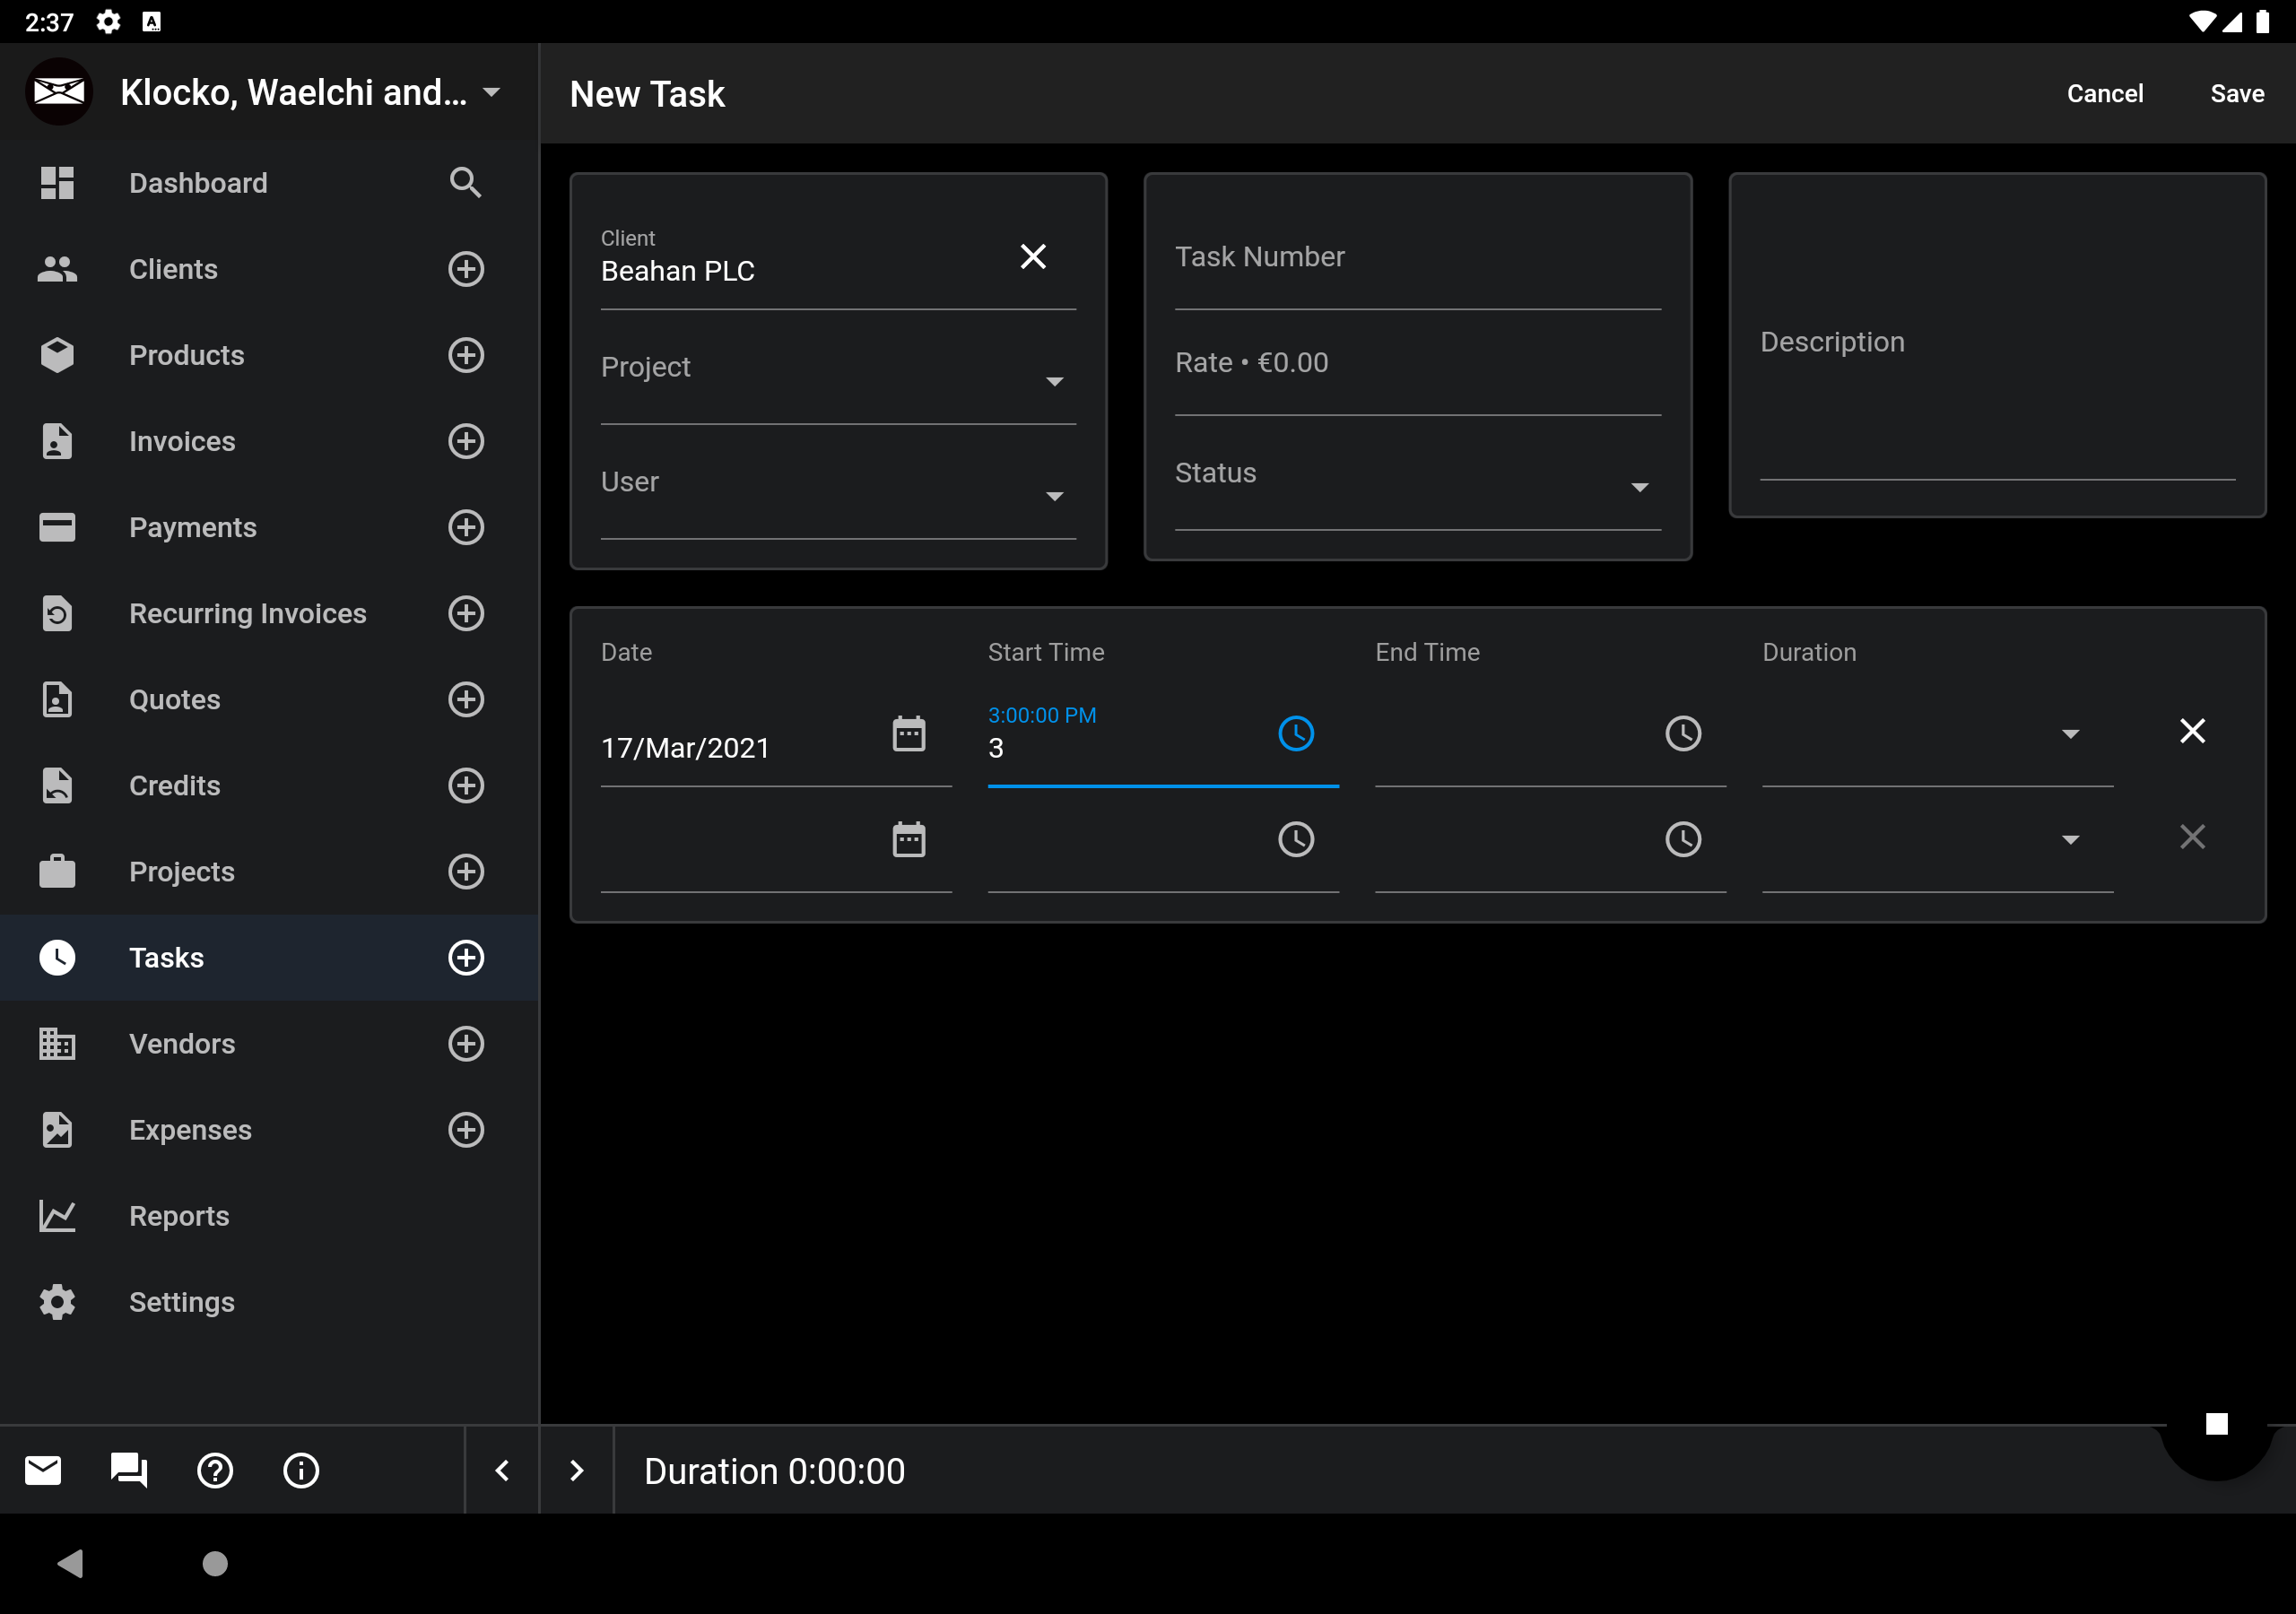
The built in date and time pickers have keyboard options however if your users need to select multiple values (ie, in a table) they can be cumbersome to use.

To solve this we implemented date, time and duration pickers which make it easier to select values with the keyboard. All of the widgets use the same basic principle: we use a FocusNode to detect when the text field has focus, parse the string to get the new value to display as a preview and then update it when the widget loses focus.

Odds and Ends

One challenge we ran into once we deployed the app is since we’re using a PWA when we release a new version users may continue using the old version for some time. Even force refreshing the page will still use the cached version which (I believe) can hang around for up to 24 hours. Majid Hajian was kind enough to share this solution which will notify the user if a new version is available.

We’re currently using local storage to persist the web app state. While it’s possible to use the browser settings to clear the storage I’ve found it’s useful to support a ?clear_local=true property to clear it, when the backend sees the flag set it displays this JavaScript to clear the storage.

      window.onload = function() {
        window.localStorage.clear();
      }

If you need more control over how tab focus traversal works you can wrap your widgets in a FocusTraversalGroup widget and set the policy, we use WidgetOrderTraversalPolicy in our app.

Final Thoughts

Although Flutter Web is an amazing technology we haven’t used it to rebuild our entire web app. We use Flutter for the admin portal which is used regularly by our users but the client portal which is used less often by more people is built using standard HTML/CSS. We think the combination of the two provides the best performance profile for each group of users.

I’d also like to thank Clemens Mol for his amazing contributions to the design, his input greatly improved the overall look and functionality of the design.

Thanks for reading! I’m on Twitter at @hillelcoren, I record a podcast about Flutter available here and you can sometimes catch me recording music on my side-project mudeo.app (also built with Flutter).

Flutter Web: Things to know…

About two years ago we decided to rewrite our native mobile apps using Flutter, then a year later we decided to use Flutter Web to convert our mobile app into our new web app. You can see the results of our efforts at invoiceninja.com/demo. This is an early pre-release demo but we’re really happy with the results so far.

While working on the app we’ve run into a few different challenges specific to Flutter Web, I thought it may be helpful to compile some of them into a post.

Checking if on Web

To start, to check if the app is running on the web you can use the kIsWeb constant.

Capture

It’s interesting to note how it’s implemented. The underlying differences can mean the runtimeType value of a variable may be different on web and mobile between int and double.

Browser Navigation

In the app we have two distinct navigation models: when the app is used on a mobile device the user can navigate between routes however in tablet/desktop layout a single ‘main’ route is used.

By default the app’s routes are integrated with the browser, when a user clicks the back button the current route is popped from the stack. This works on mobile but not tablet/desktop. To resolve this the app tracks it’s own history and uses a WillPopScope widget to ensure the right screen is shown after back is pressed.

Related to this you can use RendererBinding.instance.mouseTracker.mouseIsConnected to check if the user has a mouse.

Focus Traversal

An important difference between the mobile and web/desktop versions of the app is that users are likely to have a keyboard and mouse. Out of the the box when using the Tab key to move the focus the next element to the right will be selected.

Our app has three main columns so it’s important the focus is shifted down first and then to the right. We’re able to change the behavior by wrapping the UI in a DefaultFocusTraversal widget setting the policy parameter to WidgetOrderFocusTraversalPolicy().

NOTE: DefaultFocusTraversal has been replaced by FocusTraversalGroup #545

Conditional Imports

For some web features it can be useful to import the dart:html package, the problem is once the package is imported the mobile version of the app will fail to build with the message: Error: Not found: ‘dart:html’. This can be solved by using conditional imports.

We keep all web related functions in a file called utils/web.dart and then have another file called utils/web_stub.dart which has the same functions without the implementations. In a file where the web functionality is used we add the following import:

import 'package:invoiceninja/utils/web_stub.dart'
    if (dart.library.html) 'package:invoiceninja/utils/web.dart';

The web.dart file linked above has basic solutions for uploading/creating files as well as managing cookies.

Still Unsolved

Although we’ve made progress in most areas one feature we’re blocked on is enabling the browser to remember the username when a user logs in. We’re able to use local storage to persist the user’s data however we haven’t been able to get the browser’s password remember feature to catch the username along with the password when the user first logs in. If you have any ideas how to make this work please comment below.

password

Update: Here’s a possible solution…

Thanks for checking out the post, hope you found it useful! The source code for the Flutter Web app is available on the develop branch at github.com/invoiceninja/flutter-client. If you have any questions I’m happy to help, I’m reachable on Twitter at @hillelcoren.

Flutter 💙 The widgets are trees 🌲 your app is a forest 🌲🌲🎄

These are a few of the things I wish someone had shown me when I first started learning Flutter.

Ten Thousand
Source: xkcd, May 2012 via the Flutter Code of Conduct

To start, if things aren’t working and you aren’t sure why try running flutter clean, it’s kind of a magic fix all.

flutter clean

On Android it can help to manually delete the cache folder inside of bin and on macOS deleting podfile.lock is worth trying.

If you run into any version conflicts a good approach to fix it is to set the version to any (@koorankka), run upgrade again, and if it completes check the pubspec.lock file for the version it resolved to and use it in the pubspec.yaml file.

I also strongly recommend bookmarking the “Workarounds for common issues” page in the Flutter Wiki, in particular the section on pub dependencies.

Related to this if your project fails to open correctly in Android Studio you should be aware of the “Invalidate Caches” option.

invalidate_caches

Also in Android Studio the keyboard shortcuts (@pblead26) I use constantly are Shift + F10 to run the app, Ctrl + Alt + L to format it and Alt + Enter to show the context menu.

I’m a huge fan of dartfmt, and love how it makes the code consistent. I find it can be helpful to run:

flutter dartfmt lib

To apply formatting across the entire project, in particular this can help clean up future git commits.

A default Flutter project has pretty forgiving linting rules, you can use the sames rules as the Flutter team by downloading the analysis_options.yaml file from the repo. I highly recommend this if you’re new to Dart as it can help reinforce some best practices when getting started.

Quick shout out to Effective Dart, an amazing resource for learning Dart.

In general Flutter’s errors are extremely clear, however the Gradle build errors are sometimes a bit less informative. A useful trick is to open the android folder of the project directly in your IDE and build the app from there, it can sometimes reveal more details about the problem.

fluttersamples.com (@brianegan) is a great site to help understand the many different architecture choices available and awesome-flutter (@BlueAquilae) definitely lives up to its name.

One mistake I continue to make is to mix up the use of parentheses. For example, either of the first two are fine however if you map the property directly to the called function it will cause it to be called repeatedly most likely crashing the app and if you’re really lucky it will take down your IDE with it.

onPressed: onPressed // OK 
onPressed: () => onPressed() // OK
onPressed: onPressed() // VERY BAD!!!

Another common error is dealing with the ‘need layout/need paint’ error in rows and columns. The short answer is try adding an Expanded or Flexible widget, for a more detailed explanation checkout this great series (@scottstoll2017).

Lastly in the ‘mistakes I continue to make’ category is remembering to add .toList() when using a map to general a list of widgets.

I still rely on print statements for debugging more than I’d like to admit but by default the output can be cut off. You can use debugPrint and set a value for wrapWidth to workaround this.

debugPrint(string, wrapWidth: 1000);

Finally, here are few key Flutter links to be aware of. The projects page in the Flutter repo on GitHub provides a great high level view on what the Flutter team are actively working on. This list of links from GitHub is an excellent collection of docs detailing where the project is going in the future and the wiki has a ton of great info.

Let me know if you think I missed anything in the comments and I’ll update the post.

Hope you found this useful! You can follow me on Twitter @hillelcoren or checkout some of the projects I’m working on:

Update: here are some additional suggestions from the community:

Announcing a rewrite/version 2.0 without causing a panic

When we decided to start from scratch and build a v2 of Invoice Ninja one of our first actions was drafting a blog post to share with our community.

Before sharing it with everyone we initially posted it in our Slack group. I can’t overstate how valuable the feedback was. I thought it may be worthwhile to share the before/after versions of the post.

Here’s the initial draft.

Fork In The Road

We’re coming up on five years since we first started working on Invoice Ninja and are at a critical point in our company’s story.

When we first started working on the app we were experienced developers & marketers with basic understanding of invoicing. Over this time we’ve had the opportunity to learn a tremendous amount about invoicing practices around the world.

Although we’ve taken great care to keep our code to a high quality, a combination of domain considerations and changes to our underlying frameworks have made our code less than the perfect ideal we’re striving for.

We now have a choice to make. We can either maximize immediate profits and short terms gains, or work to reduce our technical debt creating a stable platform for the future. We choose the latter.

Our plan is simple… while building the new version, hosted platform users will continue to receive security and bug fixes. Once we’ve completed the core features existing users will be able to easily migrate over.

For self-host users we’ll create a branch in our GitHub repository which will include new features added by the community. We’ll also continue to improve our new mobile app making sure it’s entirely feature complete.

We’re at the beginning of something amazing. As always, we will be completely transparent with our work. You’ll be able to follow the development process in our GitHub repository, the new version will of course be entirely open source.

If you have any concerns please don’t hesitate to contact us. We see this as a great opportunity and hope with your input we’ll be able to create an even more outstanding invoicing platform.

Here is some of the (extremely helpful) feedback we received:

  • Rob: Is this a v2 or something else?
  • Gijs Rutten: Is there a migration process?
  • Billyggla: Those who have used Invoice Ninja will understand the post and the reasons behind it. However someone new to Invoice Ninja reading the post may come away with “Although we’ve taken great care” “less than the perfect ideal” “maximize immediate profits”. It may be simpler to put across the point that Invoice Ninja is at the forefront of invoicing software and you can continue to use it while we focus on…
  • Nateamus: Transparency is the key to any successful open source project but I think you can be a little to militant about it to the point of creating fear. Really, the net effect of this will be a vastly improved experience once everything has been refactored. Instead of posting about how you’ve “…taken great care” etc etc, I would simply inform the user base that you have bandwidth constraints and perhaps won’t be as responsive to requests because you are focusing on improving the core product. I agree with Billy that it may be a tad alarming. The net effect is going to be amazing with no change in vision, mission or direction, just perhaps less bandwidth. Perhaps that could be the focus.
  • Olivier B. Deland: I think your post is maybe too “developer-friendly”. I would start with something more client-friendly, saying that you are starting a 2.0 version which will allow you to pump more great features faster in the future, cleaner UI, or whatever, etc. Then, start a new sub section with the transparency details for people who are more interested in those things. Non-technical people, who will just stop reading at this point, need to be reassured already that everything is fine and for the better.

Finally, here’s the revised version incorporating the feedback.

Invoice Ninja v2.0

We’re excited to announce that we’re starting work on a major redesign of Invoice Ninja! By upgrading to the latest and greatest web technologies we’ll be able to provide more features at a faster rate.

We’re a small team, accomplishing this task will requires us to slow down feature development of the current version while we focus on v2.0. Once the new version is ready you’ll be able to click a button to migrate all of your data and settings.

For self-host users we’ll create a branch in our GitHub repository which will include new features added by the community. We’ll also continue to improve our new mobile app making sure it’s entirely feature complete.

As always, we will be completely transparent with our work. You’ll be able to follow the development process in our GitHub repository, the new version will of course be entirely open source.

If you have any concerns please don’t hesitate to contact us. We see this as a great opportunity and hope with your input we’ll be able to create an even more outstanding invoicing platform.

Thankfully our announcement went extremely well. I believe the revised post does a much better job of explaining our intentions without causing unnecessary fear. I’m extremely grateful to our community for their help here and of course their ongoing support of our project. We’re a few months in now… v2 is coming along great.


android-chrome-512x512

An architectural review of the Invoice Ninja Flutter app

We’ve been working on our Flutter mobile app for a few months now, I thought it may helpful to share some of the techniques we’re using to help keep our code maintainable.

OpenSourcedResized

Create widgets!

Keep your code DRY (don’t repeat yourself). Refactoring widgets is just like refactoring standard code, look for patterns of duplicate code and refactor it out to a widget. Widgets can be incredibly small but if used throughout the app they both reduce code and make it easier to apply changes later on.

For example we created an ElevatedButton widget which wraps a standard RaisedButton class so it always has a consistent elevation and enables setting the color or applying an icon. Another example is this IconText widget which just makes it easier to show an icon and text together.

Wrapping/extending widgets is a great way to customize the framework to suit your needs. We try to follow the convention where the name of the widget is the concatenation of the child widgets it combines.

View models

One of the core principles of software architecture is SRP (Single Responsibility Principle). As the views get more complicated a great way to implement separation of concerns is to create a view model which backs the view.

This enables the view to focus on the layout of the UI while the view models manage the view logic. For example, the view model would handle preparing data (ie, caching using memoize) from the central store to the format needed by the view and provide methods to dispatch actions to update the store.

Completers

In the app it’s common for the user to trigger an action in the UI which depends on completing a successful request on the server. For example, saving a new record.

Initially we passed the context in the action and had the middleware use the context, however we’ve found using completers provides much cleaner code in the UI layer.

We use a utility class to create common completer types. For example. a snackBarCompleter will show a SnackBar message if the request completes successfully or a modal ErrorDialog if the request fails.

final completer = snackBarCompleter(context, localization.archivedProduct)
store.dispatch(ArchiveProductRequest(product.id, completer));

There’s also a popCompleter which is used by actions dispatched from dialogs which will automatically close the dialog and return the response message in the call to pop().

Enums

Our app has many modules, for example: clients, products, invoices, tasks, expenses, … They all provide similar functionality (list, view, edit, archive, delete, restore) and then some provide other actions such as invoice or email.

To support this we use built_value enums. In this case we have an EntityType enum and an EntityAction enum. A nice aspect of this solution is it’s automatically serialized/deserialized when the state is persisted.

Our custom widgets then can accept an EntityType parameter which can be used to configure itself from the store. We’ve also added a lookup function in the AppLocalization class to help with translations.

Persistence

Our solution to persistence is to split up the core parts of the store (data, UI and auth) to persist each part separately. As a user makes changes to a new record we can constantly persist the UI store without needing to persist the data store which could potentially have tens of thousands or records.

If a user starts to create a new record and then quits the app we’re able to present the partially completed record when the app is relaunched. This is handled in the code by having any action which requires persistence (such as when data is loaded or modified) implement the PersistData or PersistUI abstract classes.

class SortProducts implements PersistUI {
  final String field;
  SortProducts(this.field);
}

Abstract classes

We have two types of data in the app: editable entities which the user can create and edit (such as clients and invoices) and static data which can be referenced but not changed (such as the list of languages or currencies).

To support typical interactions in the app (ie, selecting a choice from a list) we’ve created a SelectableEntity abstract class. The built_value classes then implement the class. This provide a way for each entity type to define how it should be presented and searched in a list, we use the subtitle of the ListTile to show the matching field. This class is implemented by both types of data.

The editable entities implement the BaseEntity class which provides shared functionality such as archiving and deleting and handles filtering the list by their state (active, archived or deleted) and status (ie, draft, sent, paid, …).

Clean code

If you’re just getting started I’d highly recommend using a more comprehensive analysis_options.yaml file. Our approach was to start with the Flutter project’s file and comment out if needed. This can be harder to change in an existing app as it can generate thousands of new warnings.

Hope you found this useful, if anything’s unclear or can be improved please let me know. You can follow my thoughts on Flutter on my Twitter feed or subscribe to the blog for more posts. Thanks for reading!

Continue to part 5 >>

Flutter API Docs Sorted by Length

It goes without saying that one of the best sources for information about Flutter are the API docs. Many of the widgets provide detailed explanations with useful samples.

If you have a specific widget you’re trying to use the docs are extremely helpful but if you’re new to Flutter and just want to do a bit of reading up it can be hard to find some of this great content. So of course as a developer I wrote a script…

The following list shows the widgets included in the material library sorted in reverse order by length of the explanation text.


Follow me on Twitter for more post related to Flutter.

flutter-logo-sharing

Dart for JavaScript Programmers

My perspective on Dart has quickly changed from being a language I needed to learn to build something with Flutter to a language I enjoy using on a daily basis.

dartlang-card

When starting with Flutter you often hear that Dart is just like JavaScript. Well, it is… except for when it isn’t. I thought it may be helpful to highlight some of the subtle ways in which Dart differs from JavaScript to make it easier to get up to speed when switching languages.

Conditions must have a static type of ‘bool’

In addition to types, Dart is in general a stricter language. In JavaScript you can use any ‘truthy’ value in a conditional. For example:

var name = 'Joe';
if (name) {
  // do something...

If you try the equivalent code in Dart you’d see “Conditions must have a static type of ‘bool'”. The reason is that Dart requires that a condition is a bool true not just a ‘truthy’ value. You could correct the code by changing it to:

if (name.length > 0)

But the preferred approach would be:

if (name.isNotEmpty)

Related to this, there is no triple equals (===) in Dart.

As a side note I saw this great tip on Twitter to use the same analysis_options.yaml as the Flutter team. It’s been a big help getting up to speed with Dart best practices in general.

Where is console.log

Although I’m constantly trying to train myself to rely on the debugger old habits die hard. In place of console.log you can use print. Dart supports string interpolation so whereas with JavaScript you may write:

console.log('Name is %s', name);

With Dart you’d use:

print('Name is $name');

If you need to access properties on the variable or call functions you can wrap it in curly braces.

print('Length is ${name.length}');

Function Parameters

This is one area where I think JavaScript and Dart are the most different. Dart provides a far more powerful implementation but it can take a bit of time to adjust to.

This answer on StackOverflow by Seth Ladd does a great job of explaining the differences in detail. At a high level with Dart you can either pass parameters in set positions:

getFullName('John', 'Doe');

Or you can pass them by name:

getFullName(firstName: 'John', lastName: 'Doe');

For constructors you can use this.fieldName to tell Dart that the value passed should be assigned to the property.

Contact(this.firstName);

Handling Arrays

Arrays are mainly the same but there are a few differences worth pointing out. A key difference is that you add an item to array by calling add rather than push.

Dart provides helper methods first and firstWhere which you may not be surprised to learn returns the first item in the array. What’s less obvious is that by default if a match isn’t found the methods will throw an error. You can handle this case by specifying a value for orElse which will be returned if no item is found.

Final and Const

This one took a while for it to sink in. I think this post does the best job explaining the differences that I’ve found. The key difference between final and const is that ‘final’ describes the variable whereas ‘const’ describe the value itself. A final variable can only be set once but the value it points to can be changed, a const’s value is frozen and can not be changed.

Another good tip you’ll get from using the Flutter analysis_options file is to use const constructors where possible when creating your widgets. This can have a great impact on your app’s performance by enabling the framework to cache the widgets.

Fat Arrow

The ‘Fat Arrow’ or => can be used for single line functions. For example, instead of:

someField: () {
  return true;
},

You could write:

someField: () => true,

It seems like a small difference but it can definitely have a positive impact on the readability of the code.

Odds & Ends

To wrap up here are a few other points worth keeping in mind.

  • To convert a value (for example) to a double you can either use double.parse or double.tryParse. The former will throw an error if it fails whereas the latter will not.
  • You can use null-aware operators (ie contact?.firstName) to make it easier to handle null values. This post (also by Seth) does a great job explaining it in detail.

Hope this helps, if anything’s unclear please let me know and I’ll update it.


Flutter: Using Redux to manage complex forms with multiple tabs and relationships

The full code for this post can be found here.

In my last post I described how we’re using keys to manage the state of complex forms. Although the implementation works having any state outside of our main Redux store meant that persistence was incomplete. For example, if a user started to create an invoice and then closed/reopened the app before saving their work would be lost.

Screenshot_1528817346

I had initially decided to keep some of the state separate due to the large size of our store. A user can have up to five companies linked under a single account. Each company can have thousands of clients, invoices, etc. Having to constantly write the state to disk would be CPU intensive. To solve this we’ve modified our persistence middleware to save parts of the state separately and then piece it back together when initializing the state on load.

Many of the actions in our app require persisting either data state (ie, a list of clients) or UI state (ie, the current sort field). In order to prevent having an extremely long list of actions in the reducers we’ve create two base classes PersistData and PersistUI. Actions that require either can add them as mixins. We use the same approach to track the if the app is currently loading data or not.

Here’s an example with some of the client actions.

class LoadClientRequest implements StartLoading {}

class LoadClientSuccess implements StopLoading, PersistData {
 final BuiltList<ClientEntity> clients;
 LoadClientSuccess(this.clients);
}

class LoadClientsFailure implements StopLoading {
 final dynamic error;
 LoadClientsFailure(this.error);
}

class SortClients implements PersistUI {
 final String field;
 SortClients(this.field);
}

We’re using a shell script to help quickly generate some of the boilerplate Redux code. Using the mixins has the added benefit that it requires far fewer manual adjustments to the code once it’s generated.

You can see a full example here. We’re using Redux to manage a client’s details across multiple tabs. There are a few implementation details worth pointing out.

  • The code for the reducer is a bit unwieldy. In an actual app you’d most likely use built_value which provide a clean way to handle immutability.
  • In order to update the TextControllers with the state from the model overriding didChangeDependencies seems to work best.

Hope you found this post useful. If you can see any ways to improve the code feedback is greatly appreciated!

Continue to part 4 >>

Flutter: Complex forms with multiple tabs and relationships

Note: we’re no longer using this approach, you can see our updated solution here.

In our app we needed to support editing complex entities with nested relationships, in this post I’ll try provide a high level overview of our solution.

The full code for this post can be found here

Screenshot_1528817346

For this example we’ll use a Client entity which has a name and a list of contacts, each contact has an email address.

class ClientEntity {
 ClientEntity({this.name, this.contacts});
 String name;
 List<ContactEntity> contacts;
}

class ContactEntity {
 ContactEntity({this.email});
 String email;
}

Dividing the UI into multiple tabs is relatively straightforward however as soon as we started testing we realized if a user made a change in one tab and then switched to a different tab without first clicking save their changes would be lost. Not good…

The solution is to have the state class use the AutomaticKeepAliveClientMixin. Adding the mixin is pretty simple, you just need to override the wantKeepAlive method to return true.

class ContactsPageState extends State<ContactsPage>
 with AutomaticKeepAliveClientMixin {

 @override
 bool get wantKeepAlive => true;

For most simple forms you can use keys or text controllers to access the text input values however with arrays/relationships it gets a bit more complicated. The approach we’re using is to have the master page create global keys for the sub-pages to use.

On the contacts page we store two lists for the contacts: the contact models as well as the keys for the contact form state.

List<ContactEntity> _contacts;
List<GlobalKey<ContactFormState>> _contactKeys;

@override
 void initState() {
  super.initState();
  var client = widget.client;
  _contacts = client.contacts.toList();
  _contactKeys = client.contacts
    .map((contact) => GlobalKey<ContactFormState>())
    .toList();
 }

To build the view we loop through each of the contacts/keys. When initially working on this whenever we focused the text input the focus would be lost, this was caused by using anonymous keys which were being recreated every time the view was rebuilt. The solution was to just make sure we reused the same keys when rebuilding the layout.

for (var i = 0; i < _contacts.length; i++) {
   var contact = _contacts[i];
   var contactKey = _contactKeys[i];
   items.add(ContactForm(
     contact: contact,
     key: contactKey,
     onRemovePressed: (key) => _onRemovePressed(key),
   ));
 }

When the user clicks save the master page can use the keys to generate a new client from a combination of the existing client and the changes in the form. We need to check if the state is null in case the user clicks save without first viewing the second tab.

 ClientEntity client = ClientEntity(
   name: clientState?.name ?? _client.name,
   contacts: contactsState?.getContacts() ?? _client.contacts,
 );

There’s one caveat, as of right now I haven’t been able to make this work with more than two tabs. I believe it’s a bug, I’ve opened a GitHub issue for it and hope it will be resolved before our app launches 🙂

Hope you found this post useful, if you have any suggestions to improve the code please let me know.


Flutter is Dart’s Killer App

This past week we started using Google Flutter to build a new mobile app for Invoice Ninja, I thought it may be helpful to share some of the things we’ve learned early on.

What is Flutter?

At a high level it enables building high quality mobile apps for iOS and Android using a single codebase. While this has been possible for a while now with frameworks like React Native the catch is they use a JavaScript bridge which can impact performance. Flutter compiles to native ARM code, in theory it could be considered ‘more native‘ than a native Android app which compiles to JVM bytecode.

For the record, this isn’t the first time I’ve fallen hard for a new Google technology (anyone remember GWT). That said Flutter is receiving glowing praise from the developer community, myself included.

Here are some key points to be aware of:

  • It’s completely open source, you can drill down into the libraries to understand how they work and debug problems.
  • Everything is a widget, the architectural patterns are very similar to Adobe Flex.
  • It’s becoming very popular very fast.
  • It supports hot reloading which applies code changes in real time while retaining the application state.
  • It provides a comprehensive widget library.

And some of the reasons I believe Flutter will succeed:

  • ARM is the future of mobile/mobile is the future of computing.
  • JavaScript isn’t very good, or more accurately it wasn’t initially designed for how it’s being used.
  • Probably most importantly… it’s fun to use.

Setting up a Development Environment

The setup guides are good but I ran into a few problems. I initially started on Ubuntu Linux but in the end wasn’t able to get my test app to build, the details are here in case you have any ideas.

I then switched to my MacBook. After dealing with a Homebrew issue I was able to get it running. The last OS I tried was Windows which worked out of the box.

You can choose between two code editors: Android Studio (which is built on IntelliJ) or Microsoft’s VS Code. I’ve found VS Code runs faster however Android Studio provides a more seamless experience with better debugging tools.

A few points worth mentioning:

  • On first launch I had trouble with the Android virtual machine. By default it uses x86, I needed to download a 64bit version for it to run.
  • I initially started on the beta Flutter channel but after a short while I ran into an issue which forced me to change to the dev channel.

Learning Flutter/Dart

When I learn a new technology I’m a fan of reading a book cover to cover, sadly I wasn’t able to find any Flutter books on Amazon (yet). That said their docs are excellent and there are a fair number of tutorials online.

Here are some standout references.

I’d also strongly recommend installing the gallery app on your phone, it’s a great way to discover all of the available widgets.

Finally, it’s worth mentioning that Flutter recently switched from Dart to Dart 2. A new feature in Dart 2 is the ability to remove the ‘new’ keyword when creating objects, you’ll notice a lot of older examples still include it while newer examples don’t.

Deciding on an Architecture

Probably the biggest decisions you make when developing an app (once the technology stack has been chosen) is deciding on the architecture. It seems the main choice right now comes down to whether or not to use Redux.

While many developers love it there is definitely pushback from others who feel it requires too much boilerplate code. This article by the co-author of Redux does a great job detailing the pros/cons.

The latest advice from Google seems to be to use Streams and BLoCs (business logic components) to create reactive apps, that said it doesn’t preclude also using Redux. I think the co-author of the flutter_redux package explains it well on this Reddit post.

Redux is basically a StreamController sitting in an InheritedWidget at the root of your app. StoreConnector is just a wrapper for StreamBuilder with some helper functionality.

Note: the comment will probably make more sense once you’ve learned what any of those words mean.

Starting to Code

At this point I’ve only been writing Dart/Flutter for a few days but I think I have a reasonable sense for the possibilities it enables.

Live reload is amazing but I should point out it doesn’t always work, it’s useful when fine tuning the style of a screen but can fail when making large changes to the codebase.

And finally, back to Dart. I remember first hearing about it and thinking it looked cool but at the time I had no reason to use it, with Flutter that’s no longer the case.

Continue to part 2 >>