Write the code that matters…

Code on GitHub: hillelcoren/flutter-redux-starter

I’m still relatively new to this Redux thing but it seems one point can be agreed on by everyone, there’s a lot of boilerplate code.

Building apps in many ways is like running a small company, there are always various departments at work vying for time and resources. Considering both are limited it’s imperative that developers spend their time writing the code that’s special to their app.

To help make writing Redux apps with Flutter faster we’ve created a library which automatically generates the CRUD (create, read, update and delete) code for you. It takes a standard REST API and converts it into a performant Flutter app.

starter

We’re developing this project in parallel with the mobile app for our invoicing platform. We’re working to improve the code templates through experiences solving problems for our app. The thought is if more people are using the same base templates we can collectively improve them to benefit everyone.

I created two videos to help explain the project. The first video is extremely short (a bit over a minute) and demonstrates using the project to create an app.

The second video is longer (closer to 10 minutes) and goes into more detail explaining why we created the project and how it works under the hood.

While many awesome Flutter apps look nothing like a CRUD app many others do. Hopefully the library can benefit some developers out there. If you try it out and have any questions let me know.

Flutter: Using Redux to manage complex forms with multiple tabs and relationships

The full code for this post can be found here.

In my last post I described how we’re using keys to manage the state of complex forms. Although the implementation works having any state outside of our main Redux store meant that persistence was incomplete. For example, if a user started to create an invoice and then closed/reopened the app before saving their work would be lost.

Screenshot_1528817346

I had initially decided to keep some of the state separate due to the large size of our store. A user can have up to five companies linked under a single account. Each company can have thousands of clients, invoices, etc. Having to constantly write the state to disk would be CPU intensive. To solve this we’ve modified our persistence middleware to save parts of the state separately and then piece it back together when initializing the state on load.

Many of the actions in our app require persisting either data state (ie, a list of clients) or UI state (ie, the current sort field). In order to prevent having an extremely long list of actions in the reducers we’ve create two base classes PersistData and PersistUI. Actions that require either can add them as mixins. We use the same approach to track the if the app is currently loading data or not.

Here’s an example with some of the client actions.

class LoadClientRequest implements StartLoading {}

class LoadClientSuccess implements StopLoading, PersistData {
 final BuiltList<ClientEntity> clients;
 LoadClientSuccess(this.clients);
}

class LoadClientsFailure implements StopLoading {
 final dynamic error;
 LoadClientsFailure(this.error);
}

class SortClients implements PersistUI {
 final String field;
 SortClients(this.field);
}

We’re using a shell script to help quickly generate some of the boilerplate Redux code. Using the mixins has the added benefit that it requires far fewer manual adjustments to the code once it’s generated.

You can see a full example here. We’re using Redux to manage a client’s details across multiple tabs. There are a few implementation details worth pointing out.

  • The code for the reducer is a bit unwieldy. In an actual app you’d most likely use built_value which provide a clean way to handle immutability.
  • In order to update the TextControllers with the state from the model overriding didChangeDependencies seems to work best.

Hope you found this post useful. If you can see any ways to improve the code feedback is greatly appreciated!

Continue to part 4 >>

Flutter: Complex forms with multiple tabs and relationships

Note: we’re no longer using this approach, you can see our updated solution here.

In our app we needed to support editing complex entities with nested relationships, in this post I’ll try provide a high level overview of our solution.

The full code for this post can be found here

Screenshot_1528817346

For this example we’ll use a Client entity which has a name and a list of contacts, each contact has an email address.

class ClientEntity {
 ClientEntity({this.name, this.contacts});
 String name;
 List<ContactEntity> contacts;
}

class ContactEntity {
 ContactEntity({this.email});
 String email;
}

Dividing the UI into multiple tabs is relatively straightforward however as soon as we started testing we realized if a user made a change in one tab and then switched to a different tab without first clicking save their changes would be lost. Not good…

The solution is to have the state class use the AutomaticKeepAliveClientMixin. Adding the mixin is pretty simple, you just need to override the wantKeepAlive method to return true.

class ContactsPageState extends State<ContactsPage>
 with AutomaticKeepAliveClientMixin {

 @override
 bool get wantKeepAlive => true;

For most simple forms you can use keys or text controllers to access the text input values however with arrays/relationships it gets a bit more complicated. The approach we’re using is to have the master page create global keys for the sub-pages to use.

On the contacts page we store two lists for the contacts: the contact models as well as the keys for the contact form state.

List<ContactEntity> _contacts;
List<GlobalKey<ContactFormState>> _contactKeys;

@override
 void initState() {
  super.initState();
  var client = widget.client;
  _contacts = client.contacts.toList();
  _contactKeys = client.contacts
    .map((contact) => GlobalKey<ContactFormState>())
    .toList();
 }

To build the view we loop through each of the contacts/keys. When initially working on this whenever we focused the text input the focus would be lost, this was caused by using anonymous keys which were being recreated every time the view was rebuilt. The solution was to just make sure we reused the same keys when rebuilding the layout.

for (var i = 0; i < _contacts.length; i++) {
   var contact = _contacts[i];
   var contactKey = _contactKeys[i];
   items.add(ContactForm(
     contact: contact,
     key: contactKey,
     onRemovePressed: (key) => _onRemovePressed(key),
   ));
 }

When the user clicks save the master page can use the keys to generate a new client from a combination of the existing client and the changes in the form. We need to check if the state is null in case the user clicks save without first viewing the second tab.

 ClientEntity client = ClientEntity(
   name: clientState?.name ?? _client.name,
   contacts: contactsState?.getContacts() ?? _client.contacts,
 );

There’s one caveat, as of right now I haven’t been able to make this work with more than two tabs. I believe it’s a bug, I’ve opened a GitHub issue for it and hope it will be resolved before our app launches 🙂

Hope you found this post useful, if you have any suggestions to improve the code please let me know.


Building a (large) Flutter app with Redux

Update: since writing this post we’ve created a Redux code generator to reduce boilerplate code.

To continue from my last post we’re now two weeks into the development of our new open source Flutter mobile app for Invoice Ninja. I thought it may be helpful to share some of our early experiences with Flutter and Redux.

It seems the main entry point for Flutter/Redux are these excellent sample architectures. In this post I’ll try to detail how we’ve adapted it to support our particular use cases.

The main change we made initially was to restructure our codebase in line with the layout suggested by this project. The top level folders are data, ui and redux which can be thought of as Model, View and Controller/domain. Within the redux and ui folders are separate folders for each of the app’s features (clients, invoices, etc). Using the approach has made it easier to work with related files when digging into a particular feature.

mobile_app (1)

A nice aspect of the sample architecture is that the views are split into ‘container’ and ‘presentation’ widgets (or stateful/stateless), this enables dividing the UI code into view logic and view layout. These terms come from the world of Redux however the term ‘Container’ conflicts with a ‘Container‘ in Flutter. We’re labeling Containers as ViewModels to help clarify their use in the app, we’ve also made the view model class public which enables passing it to the view rather than map each property individually.

There are two main Redux examples provided: Redux and Built Redux. My approach when working with a new technology is to start with the simplest implementation and only add in extras once I’ve felt the pain they’re designed to eliminate. Master the 4 string bass before buying the 5 string…

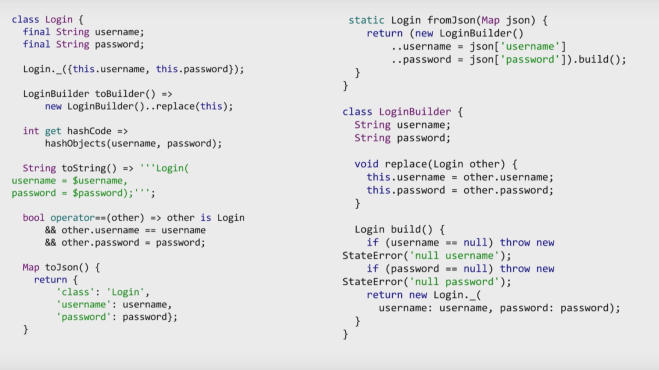
In the plain sample the models are manually generated. From quick research it seemed json_serializable was the common choice to auto generate JSON serialization code. While the library worked as advertised it left us needing to manually write the hash/equality code required to support detecting state changes in Redux. Changing over to the built_value library (which is also used by the Built Redux sample) solved this as it generates everything needed.

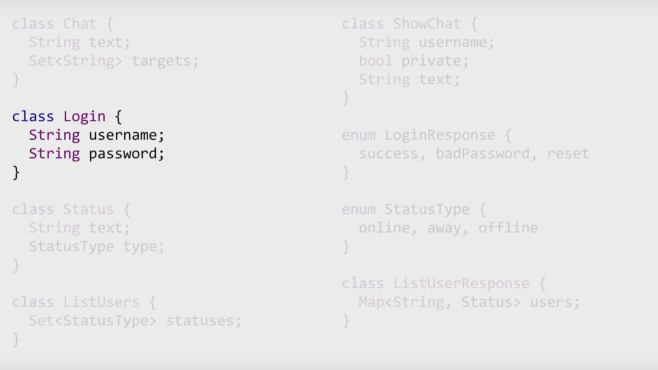
As an example, it converts a Login class from this:

before
To this:
after
One issue we ran into when refactoring the reducers was this error:
error: A value of type ‘…State’ can’t be assigned to a variable of type ‘…StateBuilder’.

We were initially able to solve it using the toBuilder() method but it had a serious code smell. Thankfully the author of the library suggested a better approach using the replace method instead.

A question that came up early on was how to handle navigation with respect to the app state. As became clear from the comments here navigation already has a state which is being tracked by Flutter. Adding it to the app state would end up duplicating the state in two places. We’re currently managing the navigator in our view models but I recently saw this suggestion to use middleware which we’re going to look into. (UPDATE: to achieve full persistence we’re now storing the current route in the state).

It’s worth mentioning that although most navigation tutorials focus on pop and push, the replace methods can be extremely useful when navigating a user through your app. For example to remove the login screen from the stack once a user has successfully logged in.

In our app each user can have up to five companies under one account. To support this our main AppState class has five companyState properties along with a selectedCompanyIndex field. We then use the index in the app_reducer to only pass the action to the selected company.

Another issue we faced was how to show a snack bar message after submitting an API request from the middleware. Our initial solution was to pass the context as a parameter in the action. This worked as the middleware was able to use the snack bar however it introduced UI concerns where they didn’t belong.

A cleaner approach we’ve switched to is to send a completer with the action. This enables the view model to handle any steps required once the action completes as well as remove the view dependancies from the middleware.

The last feature I’ll review is sorting and filtering. The app needs to handle thousands of records so this can become computationally expensive. To solve this we’re using the memoize library to cache our filtered listed.

The first time the function is called the list is calculated normally. When the function is called again with the same parameters (ie, sort/filter settings) it returns the original result without needing to recalculate which greatly improves the performance.

So far we thrilled with the development experience Flutter with Redux is providing. We’re making rapid progress and should have a basic app ready in just a few more weeks.

Continue to part 3 >>