After working on Invoice Ninja with my amazing partners Shalom and David for over a decade, I started thinking about what comes next. As developers often do, I ended up working on software to try to solve some of my own problems.
Problems
- I play bass in a Grateful Dead/70’s cover band. Sharing our schedule was harder than it should have been.
- Local shows were scattered across WhatsApp groups instead of a single, public calendar.
- The local farmers’ market is full of great vendors, but I’m too shy to ask about their products.
I wasn’t sure if I wanted to start yet another side project, but a strange thing happened when searching for a domain: one of my first .com choices was shockingly available. Clearly this was a sign.
We started working on Invoice Ninja because we saw the rise of the freelancer economy. With AI likely replacing jobs, people will start looking for new ways to make money. One option will be charging for local and online events. We can also leverage the many payment gateways supported by Invoice Ninja using a direct integration with the app.

Event Schedule is an open-source platform to share events, sell tickets and bring communities together.
- Hosted: eventschedule.com
- Selfhosted: github.com/eventschedule
Development Process
We’ve followed the same process we used for Invoice Ninja. Over the past year, we’ve slowly added users while developing the features they’ve requested. I’ve loved seeing the various schedules getting created. One of the highest traffic events was the Cyborx Festival in Germany. Another fascinating schedule is REinsTate – The Tate Institute, a Victorian community hub currently being restored in London.
A major milestone was our first organic testimonial.
As a seasoned business owner, and starting a Sound Healing venture that I require a booking calendar to be part of, Event Schedule has been great.
The ease of set up, attractive format, and most important – the support has been fast and effective – very important to any business owner.
I would HIGHLY RECOMMEND Event Schedule to others and look forward to seeing this app and company grow.
Kim Zacaruk, owner, Soul Zen Sound Baths
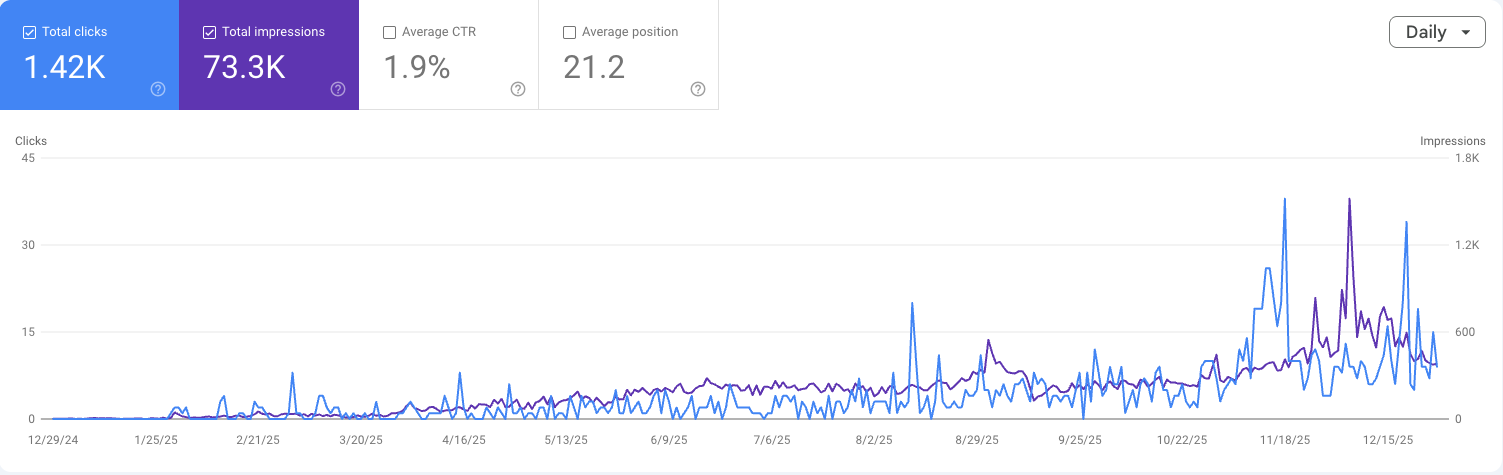
SEO is an ongoing challenge. Compared to Invoice Ninja, there’s a major advantage: the events are public. One area we’ve experimented with is an AI-generated blog. Over the past year, we’ve managed to start to gain some traction, but we still have a ways to go.
That said we’re playing the long game. We’re running our hosted platform on Digital Ocean’s App Platform, our total monthly running cost is currently $32, Digital Ocean charges $5 for the app and $15 for the database, while Gmail provides us two email addresses, each for $6. Using Gmail to send our emails limits us to 100 per day. Once traffic picks up, we’ll need to add $20 a month to support email, bringing the total running cost to $52. Not bad, if you ask me.
Although vibe coding is crazy fun, I’d hate to ship an app to production without knowing how to code. It seems like trying to drive a car while holding tennis rackets; you don’t have the control you need. At the same time, it makes a lot of sense for people with less coding experience to take a pre-existing open-source app and use AI to implement the specific changes they need.
The app is built with Laravel, a framework that has been quite literally life-changing. It’s enabled me to support my wife and five children while being a work-from-home dad. I can’t thank Taylor Otwell enough for his work on it. For now we’re using a responsive web app to support mobile, but hope to build a dedicated Flutter mobile app in the future.
The platform supports both in-person as well as online events. With global events, it’s hard to have enough coverage to make in-person events useful, but we plan to provide a public listing of online events, enabling hosts to reach even larger audiences.
Marketing Strategy
Starting a new year, I’ve decided to take off my developer hat and switch to marketing mode (hence the video and blog post). I’ve been posting to Reddit from early on but my general plan moving forward was formulated after watching this great video from Marc Lou. There are three basic steps:
- Short video leading to this post
- Short video to announce Product Hunt launch and Q&A
- Long video to showcase the product
Wrapping Up
Working in tech for 25 years, I’ve had the chance to experience many different developer roles, from working in a small startup to a large public company. I’m confident that developing a second bootstrapped SaaS is the best possible position to have. The income from the first SaaS pays the rent, enabling you to devote significant time to a second project.
I mention this because I believe developer satisfaction directly leads to developer success; a happy developer is a productive developer. Event Schedule isn’t about growth hacks or blitzscaling. It’s about building something useful and open, the same way we did with Invoice Ninja.
If you’re curious to follow along, I’d love for you to join us. Follow @ScheduleEvent and @HillelCoren for updates, and check out my personal schedule at hillel.eventschedule.com to see the upcoming Product Hunt launch and Q&A when it’s added.